
In water treatment, chemical processing, environmental protection, pharmaceuticals, and many other industries, a dosing pump is the key piece of equipment responsible for delivering chemicals accurately. Its performance directly affects process stability, product quality, and operating costs.
Many common issues in the field—such as inaccurate dosing, unstable pulsation, abnormal pump noise, liquid leakage, cavitation, or chemical backflow—are often blamed on the pump itself. In reality, nearly 90% of these problems are caused by improper installation rather than equipment defects.
Following a proper dosing pump installation guide not only improves dosing accuracy but also extends equipment life, minimizes maintenance, and reduces downtime. This guide covers the essential installation practices that are useful for installation teams, commissioning engineers, and maintenance personnel alike.
Choose the Right Installation Location
Although dosing pumps are not particularly demanding when it comes to installation environments, small details can have a major impact on long-term reliability.
Recommended Installation Conditions
Install the pump in a clean, dry, and well-ventilated area with minimal vibration. Avoid locations exposed to direct sunlight, rain, excessive dust, oil contamination, or corrosive gases. A moderate ambient temperature also helps ensure proper motor cooling and protects electrical components from premature aging.
Layout Recommendations
- Install the pump as close as possible to the chemical storage tank. A shorter suction line reduces pressure loss and minimizes the risk of cavitation or poor suction.
- Leave enough clearance around the pump for routine maintenance, diaphragm replacement, valve inspection, and parameter adjustment.
- Keep electrical cabinets and wiring away from areas where chemicals may splash to reduce the risk of corrosion and electrical failures.
Installation Tip: Never mount the pump on an inclined or unstable surface. The pump must remain level to ensure even loading on the metering chamber, maintain dosing accuracy, and prevent premature wear or leakage.
Secure the Pump Properly
Excessive vibration is one of the biggest enemies of dosing accuracy. An improperly secured pump can develop excessive noise, loose connections, and leaking fittings over time.
For reliable operation:
- Mount the pump on a solid, level concrete foundation or steel platform.
- Secure it firmly using anchor bolts and verify that it remains level after installation.
- Ensure precise alignment between the motor and pump drive components to reduce mechanical wear.
- Support all piping independently. Never allow the weight or tension of the piping to be carried by the pump head or valve assembly, as this can cause deformation, cracking, or leakage.
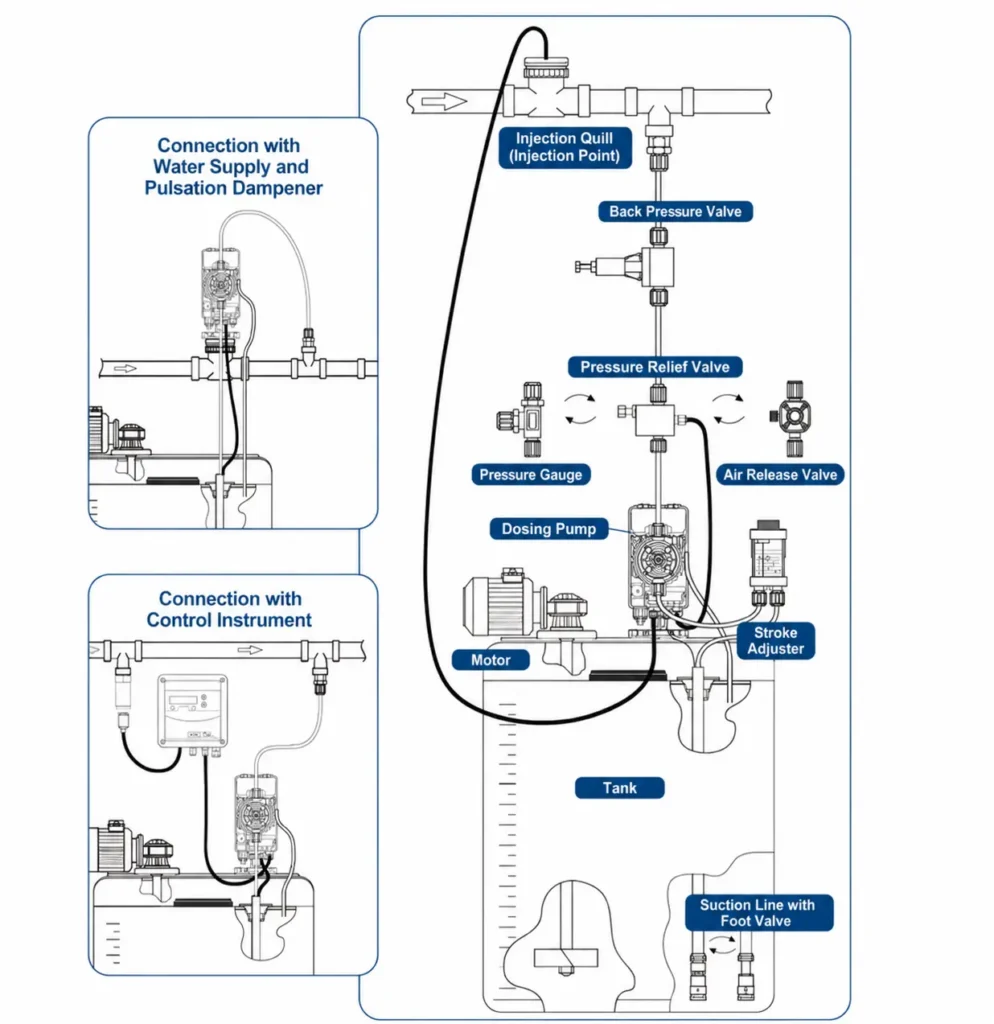
Install the Suction Line Correctly
Most problems involving unstable flow, inaccurate dosing, or dry running originate from poor suction piping design.
Best Practices
Use a flooded suction whenever possible.
The lowest liquid level in the chemical tank should remain above the pump head centerline, allowing liquid to flow naturally into the pump. This eliminates excessive suction lift and significantly reduces the possibility of cavitation.
Keep the suction line short and straight.
Minimize pipe length, bends, and unnecessary fittings to reduce flow resistance and prevent air pockets.
Install a suction strainer.
A filter protects the diaphragm and check valves by preventing debris or crystallized particles from entering the pump. Transparent strainers are recommended for easy inspection and cleaning.
Install a foot valve if flooded suction is not possible.
Where installation conditions require suction lift, a foot valve helps prevent liquid from draining back into the tank when the pump stops, keeping the suction line primed.
Important: Avoid any high points in the suction piping where air can become trapped. Air pockets often result in erratic dosing, intermittent operation, and dry-running noise.
Install the Discharge Line Properly
The discharge piping should maintain stable system pressure while preventing backflow and overpressure.
A properly designed discharge line should include the following components:
- Back pressure valve– Maintains consistent discharge pressure, prevents siphoning and chemical backflow, and improves dosing accuracy.
- Safety relief valve– Typically set at approximately 110% of the pump’s normal operating pressure to protect both the pump and the piping system from excessive pressure.
- Pressure gauge– Allows operators to monitor discharge pressure during commissioning and routine operation.
Additional recommendations include:
- Install an air release valve where necessary and remove all trapped air before startup.
- For chemicals that tend to crystallize or precipitate, use heat tracing or pipe insulation to prevent blockages.
- Support discharge piping independently to avoid placing mechanical stress on the pump head.
Electrical Installation
Electrical installation should always comply with applicable safety standards and local electrical codes.
Key requirements include:
- Verify that the power supply voltage and frequency match the specifications on the pump nameplate.
- Ensure all electrical connections are secure and correctly wired.
- Properly ground the pump to prevent electric shock and static buildup.
- Protect control panels and terminals from moisture, chemicals, and corrosion.
- For variable-frequency or smart dosing pumps, route signal cables separately from power cables to minimize electrical interference and maintain stable control signals.
Commissioning After Installation
Completing the installation is only the first step. Proper commissioning ensures the system performs as designed.
The commissioning process should include:
- Visual inspection– Verify that the pump is level, firmly secured, and that all piping connections are properly installed without excessive stress.
- Leak test– Check every connection for liquid leakage or air ingress before operation.
- Air bleeding– Open the bleed valve and completely remove air from both the pump head and piping until the discharge flow is smooth and bubble-free.
- Test operation– Start the pump at low speed, monitor for abnormal vibration or noise, confirm stable system pressure, and calibrate the dosing rate.
- Record operating data– Document flow rate, pressure, stroke settings, and other commissioning parameters to simplify future maintenance and troubleshooting.
Conclusion
The long-term performance of a dosing pump depends just as much on proper installation as on equipment quality.
Following a professional dosing pump installation guide helps prevent inaccurate dosing, cavitation, leakage, premature component wear, and unexpected shutdowns. By paying close attention to installation location, pump mounting, suction and discharge piping, electrical wiring, and commissioning procedures, operators can achieve stable chemical dosing, extend equipment service life, and significantly reduce maintenance costs.